



How to Install a Hair System: A Step-by-Step Guide to Hair System Installation
A professional men’s hair system installation starts with four decisions: confirm the fit, mark the hairline, prepare the scalp and base, then choose an attachment method that suits the base material and the client’s maintenance routine.
This guide is for hairstylists, barbers, and hair-replacement professionals. It explains how to prepare the scalp, trim the base, use tape or liquid adhesive, attach the system accurately, and finish the cut and style. It is also useful for professionals searching for a men’s hair piece installation process.
Before you begin: confirm the client’s preferred hairline, hairstyle, cap type, method, and expected removal schedule. A good fit and the right bonding method help reduce lifting and improve comfort.
Attention: This guide is written especially for hair professionals. If you are a personal wearer, we highly recommend you look for a salon or hairstylist that provides hair system fitting and styling services in your local area in case of wrong attachment or even damage.
Related:
- 12 Best Tape and Glue for Men’s Hairpieces
- How to Get Glue or Tape Out of Hair Pieces or Wigs
- What to Do When Tape Does Not Stick to a New Hair System
- What Is a Toupee? Types and Men’s Toupee Options
- How to Install and Style a Frontal Hair Piece
Key Takeaways
- A successful hair system installation begins with an accurate template, a client-appropriate hairline, and a base trimmed to fit.
- Clean and dry both the scalp and the underside of the hair system before bonding; residue and moisture can contribute to lifting.
- Choose the attachment method by base type and maintenance routine: tape is commonly used for many mesh/lace systems and regular removal, while liquid adhesive commonly suits skin/poly bases.
- Set the front hairline carefully, then position the unit gradually from front to back to avoid wrinkles, air bubbles, and trapped natural hair.
- Check the full perimeter before styling, and give the client a maintenance plan that matches the chosen base and attachment method.
- When lifting occurs, clean the affected scalp and base areas before reattaching—do not simply press a loose edge back into place.
Choose the Attachment Method Before You Start
| Base or situation | Typical attachment direction |
|---|---|
| Many mesh or lace bases; regular removal | Double-sided tape |
| Skin/poly base | Liquid glue or adhesive |
| Hybrid base | Match the method to each bonding area |
| Unsure of compatibility | Check the base and adhesive guidance before bonding |
The best method depends on base type, removal frequency, activity level, and skin condition. Newtimes Hair’s maintenance guidance commonly recommends tape for mesh and regular removal, while liquid glues generally suit skin/poly bases. Read the tape and glue guide
Tools for a Professional Installation
Learning how to install a men’s hair system can be exciting. First, you also have to make sure that you have the following tools for a streamlined hair system application. Treat them as your installation kit.
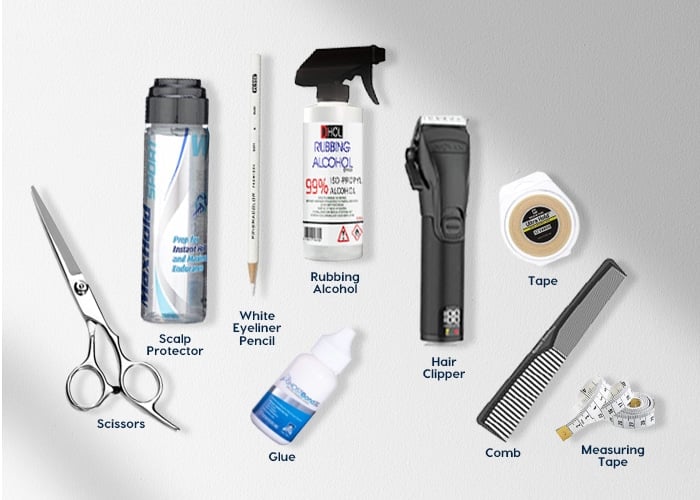
- Client template and measuring tape
- Electric clipper or shaver
- Comb and sectioning clips
- Scissors for trimming the base
- White eyeliner pencil for temporary placement marks
- Alcohol-based cleaner and clean wipes or cotton pads (like 99% alcohol wipes/spray)
- Scalp protector, when appropriate for the adhesive and client
- Double-sided tape or liquid glue selected for attachment
- Mirror for checking alignment and hairline placement
Men’s Hair System Installation: Step-by-Step Process
Whether you’re a budding hairstylist or you just want to learn the best practices for men’s hair piece installation, it’s vital to learn how to install it properly. Following the proven steps of how to put on a hair system can save you from pitfalls during the application process.
Step 1. Preparation: Get Your Scalp Ready to Install the Hair System
Let’s start with the scalp prep step – preparing your scalp for installation.
At this step, you will need a template to help you divide the area where you will attach the new hair system.
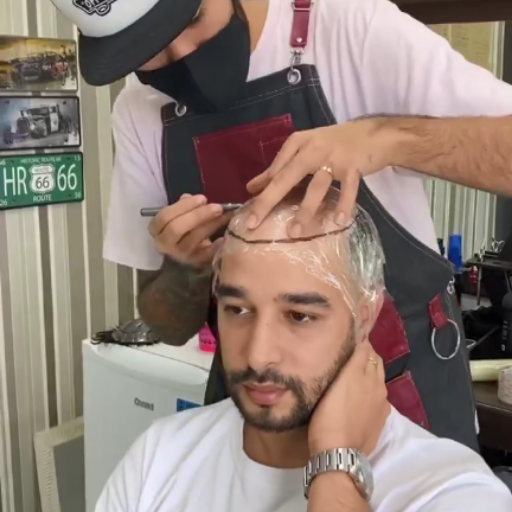
You can make a template for each of your clients following our instructions on how to make a toupee template (click to check). You can also follow the easy method in the video below to make the template with a head template replicator(click to shop).
Once you have the head template, you can use a razor for the areas around the head for sectioning.
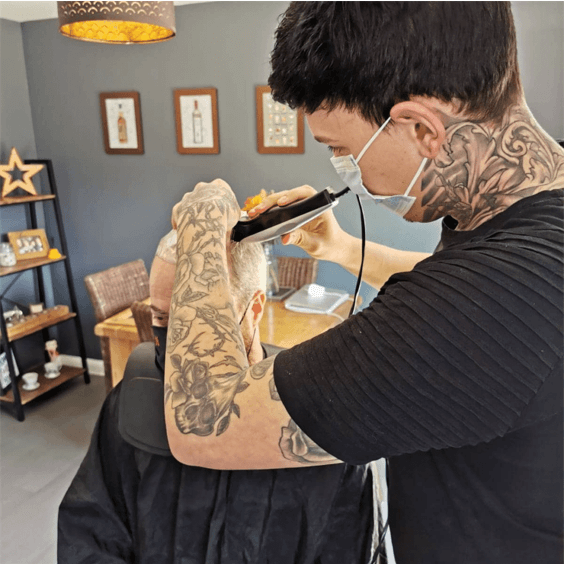
If your client is a man, he may have bald spots on top of his head. So, the second thing to do to prepare the scalp is to shave off the existing hair in the balding area. Make sure to clean-shave the entire section using a balder so that the toupee will stick well to the skin.
Step 2: Confirm the Fit and Mark the Hairline
Start with the client’s template. Use it to confirm the coverage area and how to trim.
Agree on the hairline before shaving or applying adhesive. Consider the client’s existing hairline, facial proportions, age, preferred hairstyle, and reference photos.
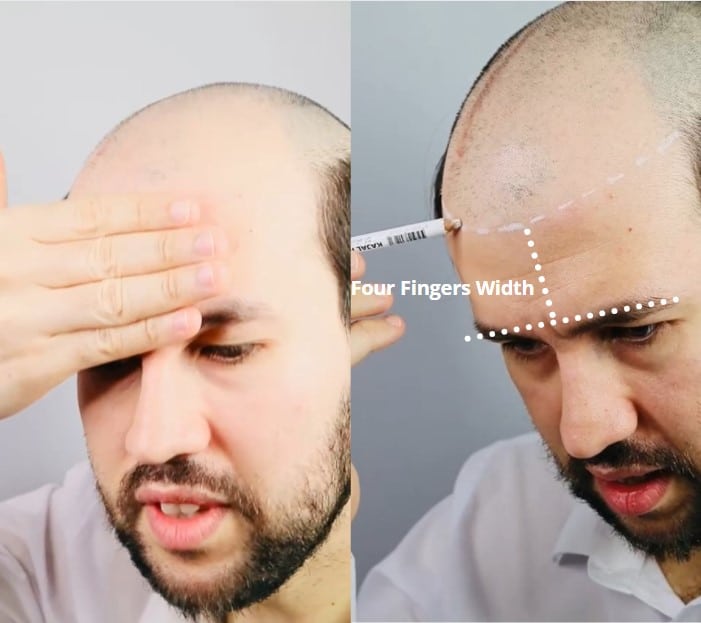
Most hairstylists usually use four fingers to mark the area of the hairline. Locate the hairline by placing your four fingers between the eyebrows. Stack your fingers up towards the hairline. The space next to your fourth finger will be the hairline. Mark the areas of the hairline using white eyeliner.
The finger measurement may be a useful starting reference. But it should not be treated as a universal hairline rule, as each person’s finger widths vary.
Mark the planned front hairline and attachment perimeter lightly with a white eyeliner pencil. Clip or comb natural hair away from the attachment area before continuing.
The next step is to choose where you want to place the toupee and mark the correct part on the forehead.
Step 3. Base Trimming: Trim the Base of the Hair System to Size
People have different-sized heads, and you’ll need to account for that. You need to make sure that the size of the hair system fits perfectly with the unique needs of the client.
If you use a supplier’s base-cutting service, confirm the current service availability and pricing before ordering.
You can also choose to cut the base to size yourself. Cutting the base of the hair system may seem hard in the beginning. But with proper tools and the right instructions, you can easily cut the it without damaging the hair system.
Step 1: Following the edge of the template we mentioned above, draw the exact size that you need for the hair system.
Step 2: Now, before you begin to cut the excess part of the base, comb and hold the system hair safely away from the cutting line before trimming the excess part.
Step 3: Cut the line carefully using your scissors.
Find out more on how to cut a hair system base to size.
Step 4. A Thorough Cleaning: Clean and Dry the Scalp and Base
Shave the attachment area as needed, then remove oils, old adhesive residue, and product buildup from the scalp. Clean the scalp and underside of the hair system according to the product guidance, then allow both surfaces to dry completely before bonding.
A clean, dry scalp and underside ensure a secure bond. A correct fit also helps reduce lifting and improve comfort.
If a brand-new unit does not adhere as expected, check for residues and follow the preparation guidance for the specifics.
Why is cleaning the scalp super important?
The scalp of the client may have unseen signs of oil and dirt. That is why it is important to make sure you clean and dry the head before you put on the toupee. Clean the scalp by spraying a 99% alcohol solution on the scalp. Use a wipe to gently remove any dirt and oils.
You can repeat this step several times to ensure that no oil and residue remain on the scalp. Also, wipe or gently massage the head with the alcohol. The alcohol will ensure that your hands remain clean as well. Afterward, leave the scalp to dry. If you want to dry the scalp faster, you can use a blow dryer as well. Remember that the cleaner the scalp, the better the hair system will secure to the scalp.
Meanwhile, you need to ensure that the hair system and its underside are clean and dry as well. You can spray or wipe alcohol on the underside.
There is feedback from our clients that their new hair system just doesn’t adhere to wig tape or glue. This is largely related to a special production process called “grease conditioning”, which can make the unit less reactive to the adhesives. We suggest you fully shampoo and clean the hair system if it is a completely new one. Click to check out our guide on what to do if your tape doesn’t stick to new hair systems.
Clean until both the hair system and the scalp are dry before hair installation. This will ensure that the hair system sticks well to the head and lasts longer.
This preparation work is VERY IMPORTANT and NECESSARY, it decides how long and securely your hair system will stay on head.
Step 5: Protection: Apply Scalp Protector
A scalp protector may be used when it is compatible with the selected adhesive and appropriate for the client. Follow the product instructions before application.
During the consultation, ask about the client’s removal routine, activity level, climate, and previous adhesive experience. These factors can affect adhesive selection and maintenance planning.
This step is optional. But if your clients have sensitive skin, you should consider using a scalp protector. A scalp protector prevents the scalp from dermal irritations. This solution serves as a shield against possible adverse reactions from the toupee adhesives.
The hair system may also easily loosen when the wearer lives in a high-humidity area. Likewise, if the wearer loves to swim, the bond of the hair system to the scalp can come loose. A scalp protector not only shields the scalp but also secures the hair unit for a longer time. Thus, improving the firmness of the hair replacement system.
Take the time to talk with your client further. Ask the right questions to understand their skin, lifestyle, and climate conditions so you can decide whether to apply a scalp protector. Understanding your client will help you best serve their needs.
Step 6: Method for Attachment: Tape or Glue
Before removing tape backing or placing the system, check the planned hairline, unit orientation, and bonding method. Work slowly: correcting the front hairline after it bonds is much harder than checking alignment first.
Learn how to choose a men’s hair system base.
Tape-Only Attachment
As liquid glue or adhesive easily seeps through the mesh, most stylists prefer to use only tape on hair systems with a mesh bottom, like lace or monofilament.
Cut double-sided tape into pieces that suit the perimeter and planned attachment area. Press each piece firmly (usually 3-4 times), close to the edge without extending beyond it.
Remove the tape backing when ready to attach. Align the front hairline with the placement marks, then lower the system from front to back. Keep natural hair and baby hairs clear of the adhesive. Press across the bonded areas gradually, working outward to prevent air bubbles and wrinkles.
Tape-only attachment can be practical for clients who remove their system regularly.
How to use tape on a hair system
Liquid-Adhesive Attachment
Liquid glue or adhesive is especially useful for skin hair systems or the perimeter of a hybrid system.
Apply a thin, even layer of liquid glue or adhesive to the prepared scalp in the designated attachment area. Wait for a few minutes, following the adhesive manufacturer’s instructions for drying time and tackiness.
Set the front hairline first, then lower the rest of the system into place carefully. Press it down gradually and check that it lies flat without bubbles or wrinkles.
Liquid glue or adhesive is commonly used for skin/poly bases. Follow the guidance for the specific hair system and adhesive, particularly around lace-front areas.
When glue is ready for hair system installation
Tape + Glue Attachment
For selected installations, tape and adhesive can be used together for added security. This is especially useful for hybrid hair systems, like lace with a skin perimeter.
Some stylists are also capable of using adhesive on lace. You may be able to do that too. All you need to know is how to apply glue evenly without letting it seep through the lace and time it correctly just before it turns absolutely dry.
To most stylists, the most reliable way is to apply tape on the mesh and liquid glue or adhesive on the skin.
When the adhesive is ready, remove the tape backing, align the front hairline, and position the system from front to back. Press across the perimeter and bonding areas to ensure full contact.
Use this method only when the chosen unit and bonding products are compatible. More adhesive is not automatically a better installation.
Learn more on what to do if tape does not stick to a new hair system.
Clips, Combs, and Glueless Options
If the client has enough natural hair, a system designed for clips or combs may offer an alternative to adhesive attachment. Glueless systems can also be appropriate where the base includes built-in adjustment or anti-slip features.
Combs or clips are usually added to women’s full cap wigs. We rarely add combs and clips to men’s hair systems. We can supply small, medium, and large-sized clips, and they can be in brown, black, or the color of the skin. With clips, your client can easily remove the unit anytime they want.
Confirm that the selected unit is designed for this method. Do not add clips or combs without checking whether the construction can support them.
Step 7. Attachment: Attaching the Hair System
Attaching the hair system to the head is the most anticipated part of the installation.
The unit application requires accuracy and patience. You need to put enough pressure to help the adhesive stick well to the unit and the scalp. You should also be gentle so as not to damage the unit itself.
Tape and glue are two of the most often used adhesives to attach a toupee or unit. Still not sure what to use for the installation? Here are the 12 Best Tapes and Glues for Men’s Toupee and Hairpieces installation. And this guide can help you choose between Tape vs. Glue for your hairpiece installation.
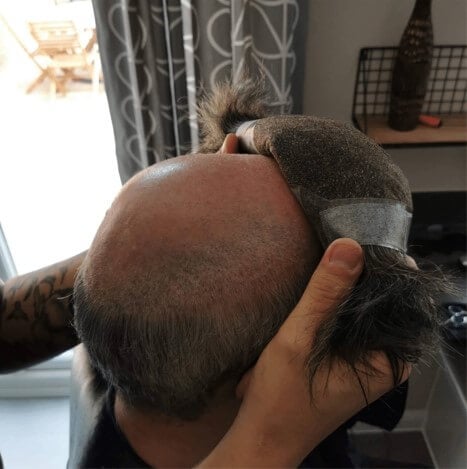
With liquid-adhesive attachments, before attaching the unit to the head, apply a few layers of glue on the scalp. The first layer of glue should be spread evenly across your scalp without touching any hair outside the shaved area. Using a clean spatula, spread the glue without missing a spot. The first layer of adhesive should be left to dry prior to applying the second layer. The second layer should be left to dry before the application of the third layer.
While waiting for the glue to dry on the scalp, you can start applying the same glue to the underside of the unit.
After that, you can carefully begin to attach the hair system to the client’s head. Gently position your hair system at the attachment area. Start from one end of the unit while following the division and the marks that you made earlier using the eyeliner.
Press the hair unit firmly to the scalp to avoid air bubbles and wrinkles. Be sure to flatten the it without causing damage.
Hair system supplies and accessories.
Step 8. Hairstyling: Cut and Style the Hair
Before cutting or styling, inspect the front hairline, temples, sides, and back perimeter. The unit should sit flat, follow the placement marks, and show no wrinkles, lifting, or trapped natural hair.
Use the flat edge of a comb or your fingertips to press the bonded areas firmly. Check the perimeter once more after the unit is seated.
During your initial consultation with your client, discuss the flow of the process. You can ask his or her style preference so you will know how to cut and style the hair after attaching it.
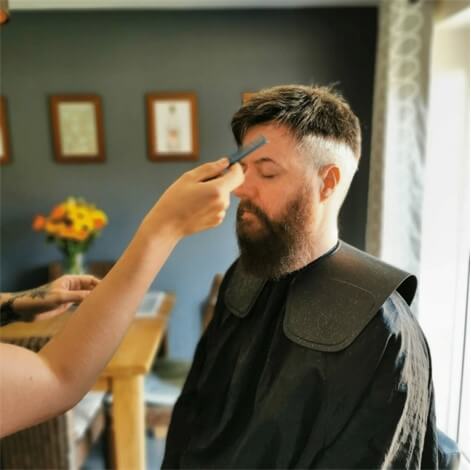
Style the hair as your customer has requested. Be sure to mix the hair of the unit with the customer’s natural hair to achieve a more natural look. You can also use styling powders to finish the look. Keep in mind that the bond will take a while to cure. Don’t pull the hair too tightly while cutting or styling it. Be sure not to use harsh chemicals or styling products on the unit while it is still curing.
If you prefer to skip this step, you can also order a pre-hairstyling service from Newtimes Hair. Our professional hairstylists will cut and style the hair for you before shipping, and you can put it on your client’s head without much more styling work to do. Contact our team to learn more about your styling options.
Removal and Adhesive Cleanup
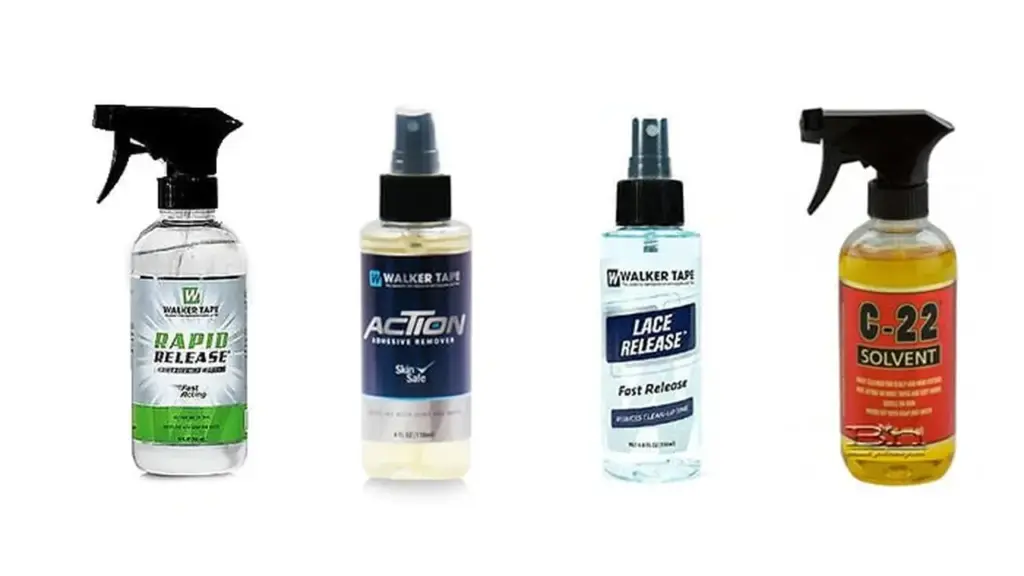
Removal should be planned as carefully as installation. Use an adhesive remover compatible with the specific base and bonding product, following its instructions. Begin at the back edge where possible and lift the unit gradually rather than pulling it off in one movement.
Refer to our complete hair system removal and scalp cleaning guide.
After removal, clean adhesive residue from the scalp and underside before the next installation. Product buildup and leftover adhesive can interfere with the next bond and make fine base areas harder to maintain.
We highly recommend using Rapid Release for soaking the units, but this product should not be used for poly.
If you need something to soak the unit that can be applied to skin, we would recommend C22 or Action Release for numbers, No-shine bonding tape, Ultra hold tap, and Ultra-hold glue.
For tape applied on lace, you can use Lace Release to remove the hair systems while leaving the tape on the head, and then use C22 to remove the tape from the scalp.
How to Reduce Lifting Between Appointments
Bond duration varies by base material, adhesive, skin condition, activity level, climate, and removal routine. Give clients a maintenance plan that matches the unit and method used.
When the unit has lost its tack, you should fix the problem immediately. However, take careful precautions to prevent the same incident from happening again. Follow the tips to keep the unit in place. To ensure that it stays in place, explain best practices to your client as well.
Here are proven tips that can help prevent the hair system from falling off
Apply More Pressure on the Hair System to Set It in Place
After a successful installation, you can gently massage the scalp to help them bond well together. A little more pressure on the unit can help the glue stick well on the scalp. Some customers love the relaxed feeling of a head massage. So, treat this as one.
Keep the Scalp and Base Clean
Oils, adhesive residue, and product buildup can weaken a bond. Clean and dry the relevant scalp and base areas before installation and during planned maintenance.
Clean Adhesive and Product Residue From Their Units
Remind clients to remove tape, glue, shampoo, conditioner, and other product residue thoroughly during each planned cleaning routine. Residue left on the base can interfere with future bonding and make the system harder to maintain.
This is especially important for fine monofilament bases. Their tight weave can trap adhesive residue, oils, and product buildup in small holes. If residue remains over time, it can affect the hair roots and contribute to increased shedding.
Clean the base carefully using products and methods compatible with its construction. For stubborn adhesive residue, follow the remover instructions and avoid pulling or scraping aggressively.
Get the Correct Method of Attachment for the Client
Choose tape, liquid glue or adhesive, a combined method, or a glueless one depending on the base material and the client’s lifestyle. A stronger product is not automatically the better choice.
Use an extended-wear tape. A stronger, waterproof tape can lengthen the lifespan of the unit’s adhesion to the scalp.
The scalp protector can be essential for highly active clients. They also act as a good barrier against daily chemicals like shampoos.
Check the Perimeter Early
Encourage clients to check the front edge and perimeter for early lifting. A small loose area is easier to clean and reattach than a widespread bond failure.
Find out more on how to look after a hair system through our complete hair system care and maintenance routine.
What to do When the Hair System Starts to Lift
If a small area begins to lift, do not simply press it back onto an unclean surface. Remove residue from the affected area, clean and dry both surfaces, then reattach using a compatible product and method.
If lifting is widespread, remove the unit and complete a full clean before reinstalling it. Review the likely cause: incomplete preparation, moisture, product buildup, poor fit, or a method that does not suit the unit.
Reattaching Loose Hair System
Adhesives do not last forever; even if you choose a reinforced one, the unit will still get loose over time. Especially when it often gets wet from water, rain, or sweat, the adhesives can weaken.
However, your hair toupee will feel loose long before the adhesive fails.
Ask your client to take some time every other day to check if the unit loses it to track. Once noticed a part of the edge gets loose, take some time to properly attach the loose part with tape or glue.
Removing and Reattaching Hair Systems
For a glue-on hair system, it typically needs to be removed, completely cleaned, and reattached every three to four weeks.
You will need to dissolve the adhesives with C-22 adhesive solvent and peel it off completely from the scalp and the unit, prepare the scalp again, and finally reattach the hair toupee to the scalp.
For the complete process, you can check out our guide Hair System Removal and Scalp Cleaning.
Final Thoughts
A successful men’s hair system installation depends on accurate fitting, clean preparation, suitable attachment products including tape and adhesive, and a realistic maintenance plan. The key decision is not simply tape versus glue—it is choosing a method that matches the base material and the client’s routine.
Newtimes Hair supports hair-replacement professionals with men’s hair systems, base options, and custom-order support. Explore the available systems or contact our team to discuss professional requirements.
FAQs
1. Use the scalp protector before adhesives.
2. Use a clip-on hair system.
French lace — a lace option that prioritizes natural appearance with more durability than Swiss lace.
Swiss lace — a finer lace option for a highly natural-looking hairline.
Skin/poly — a smooth, non-lace base that is straightforward to clean and commonly attached with tape or glue.
Monofilament (mono) — a durable mesh base suited to higher densities and longer service life.
Hybrid — a combination of materials, such as lace with a PU/skin perimeter, designed to balance natural appearance, attachment security, breathability, and durability.
Learn how to choose a perfect hair system for your client.